一、环境信息
- 服务器系统:CentOS Stream release 8;
- 服务端v2ray-core版本:v4.44.0,地址:https://github.com/v2fly/v2ray-core/releases ;
- 客户端Windows图形界面v2rayN:5.9,地址:https://github.com/2dust/v2rayN/releases ;
- VPS:我使用的是digitalocean;
- 使用的是root用户;
二、搭建脚本说明
使用到的官网安装脚本:https://github.com/v2fly/fhs-install-v2ray,该脚本在执行时会提供info和error等信息,请仔细阅读。
三、搭建v2ray
使用xshell对VPS进行了远程连接,这里假设你已经使用root用户登录成功了。下面开始安装:
3.1 更新系统
yum update
3.2 安装curl
yum install curl -y
3.3 安装v2ray
使用curl进行安装
// 安裝執行檔和 .dat 資料檔bash <(curl -L https://raw.githubusercontent.com/v2fly/fhs-install-v2ray/master/install-release.sh)
在安装过程中,会打印详细的安装说明,里面有使用的配置文件信息,显示配置文件在/usr/local/etc/v2ray/config.json这个位置。
输入vi /usr/local/etc/v2ray/config.json命令,编辑配置文件的内容为以下内容:
{"log":{"access":"/var/log/v2ray/access.log","error":"/var/log/v2ray/error.log","loglevel":"warning"},"inbounds":[{"port":11055,"protocol":"vmess","settings":{"clients":[{"id":"27848739-7e62-4138-9fd3-098a63964b6b","level":1,"alterId":0}]},"streamSettings":{"network":"ws","wsSettings":{"path":"/tech"}}}],"outbounds":[{"protocol":"freedom"}]}3.4 启动v2ray服务
#启动并加入开机自启systemctl start v2ray;systemctl enable v2ray
3.5 安装nginx
执行安装
yum install nginx -y
新建网页目录
这里在假设是/root/www。
mkdir -p /root/www
新建首页
在/root/www目录下新建一个index.html文件,
vi /root/www/index.html
内容如下:
<html><title>欢迎访问四个空格</title><head><metacharset="UTF-8"></head><body><ahref="https://www.4spaces.org/install-v2ray-v-4-44-on-debian-2022/">四个空格</a></body></html>
新建配置文件
注: 不同版本的nginx配置文件可能有区别,我的是nginx/1.18.0,配置文件/etc/nginx/sites-enabled/default。或者你的配置文件可能在/etc/nginx/conf.d/default.conf。
输入vi /etc/nginx/sites-enabled/default命令,编辑nginx配置文件为如下内容:
server{ listen 80; server_name v1.xxxx.com; index index.html; root /root/www/;}这里你可能需要将/etc/nginx/nginx.conf中第一行user www-data改为user root,即当前用户。
启动nginx服务
#启动Nginx并设置为开机自启systemctl start nginx;systemctl enable nginx#查看nginx启动状态systemctl status nginx
在浏览器里访问v1.xxxx.com,如果正常则说明nginx配置没问题,这是是没有加密的,不带HTTPS的网址:http://v1.xxxx.com。
3.6 安装certbot并申请ssl证书
详细的申请证书流程参考: certbot instructions – Nginx on Debian 10 (buster)。具体如下:
安装snapd
yum install -y snapdsystemctl enable snapdsystemctl start snapd# symlink from /snap to /var/lib/snapd/snapln -s /var/lib/snapd/snap /snap
确保snapd为最新版本
snap install core; snap refresh core
安装certbot
snap install --classic certbot
创建软链
ln -s /snap/bin/certbot /usr/bin/certbot
申请证书
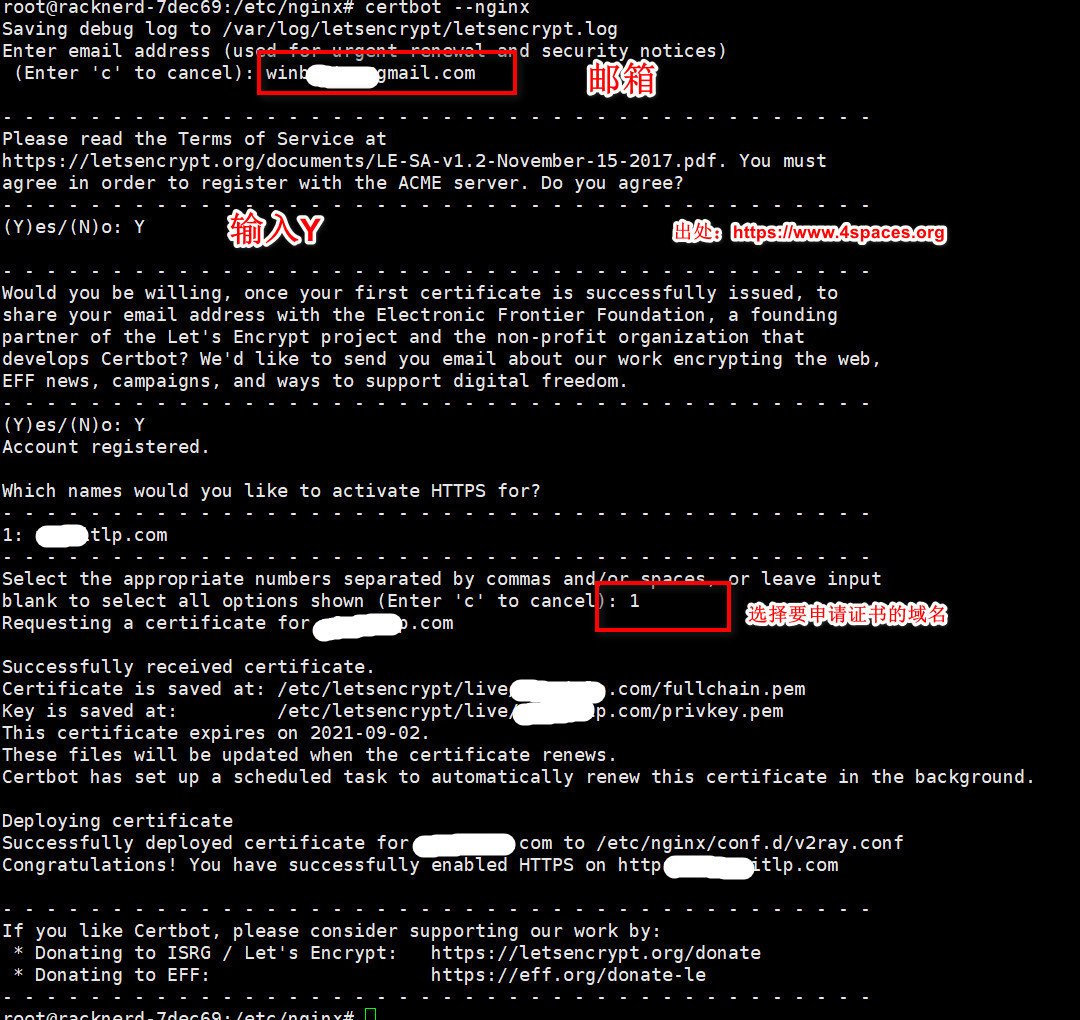
运行certbot --nginx开始申请证书,如下:

稍等一会,会提示证书安装成功! 你会发现nginx的配置已经更改,我的/etc/nginx/sites-enabled/default文件被自动修改为以下内容:
server{ server_name v1.xxxx.com; index index.html; root /root/www/; listen 443 ssl;# managed by Certbot ssl_certificate /etc/letsencrypt/live/v1.xxxx.com/fullchain.pem;# managed by Certbot ssl_certificate_key /etc/letsencrypt/live/v1.xxxx.com/privkey.pem;# managed by Certbot include /etc/letsencrypt/options-ssl-nginx.conf;# managed by Certbot ssl_dhparam /etc/letsencrypt/ssl-dhparams.pem;# managed by Certbot}server{if($host = v1.xxxx.com){return301 https://$host$request_uri;}# managed by Certbot listen 80; server_name v1.xxxx.com;return404;# managed by Certbot}此时,在浏览器里访问v1.xxxx.com已经是https开头的了,地址:https://v1.xxxx.com。
3.7 添加v2ray转发
将/etc/nginx/sites-enabled/default更改为以下内容:
server{ server_name v1.xxxx.com; index index.html; root /root/www/; listen 443 ssl;# managed by Certbot ssl_certificate /etc/letsencrypt/live/v1.xxxx.com/fullchain.pem;# managed by Certbot ssl_certificate_key /etc/letsencrypt/live/v1.xxxx.com/privkey.pem;# managed by Certbot include /etc/letsencrypt/options-ssl-nginx.conf;# managed by Certbot ssl_dhparam /etc/letsencrypt/ssl-dhparams.pem;# managed by Certbot## 添加这部分内容,22055对应/usr/local/etc/v2ray/config.json 里面inbounds端口## /tech客户端配置的时候需要,对应/usr/local/etc/v2ray/config.json streamSettings里的path location /tech { proxy_redirect off; proxy_pass http://127.0.0.1:11055; proxy_http_version 1.1; proxy_set_header Upgrade $http_upgrade; proxy_set_header Connection"upgrade"; proxy_set_header Host $http_host;}}server{if($host = v1.xxxx.com){return301 https://$host$request_uri;}# managed by Certbot listen 80; server_name v1.xxxx.com;return404;# managed by Certbot}然后运行systemctl restart nginx重启nginx。
3.9 客户端v2rayN配置
相关文章:
